I recently wrote an article on Pepper Spray and its History and I wanted an image for it. I had something specific in mind. I did a web search and found what I wanted; but in two different images. I had to do some cropping and fancy combining. Here are the two images after the cropping.
Here's how you can combine them.
Preparing the Canvas
1. Open GIMP.
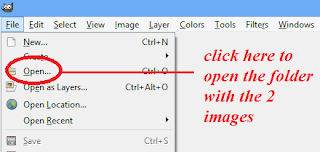
2. From the File Menu choose Open to open the two image files. You'll find that they open on two different canvases.

3. You'll need a third canvas to work on; customized to accommodate both images. You can open a new one from any of the already open canvases. But how do you determine the size of your new canvas?
4. To do this, click new from the file menu of the chili canvas. It opens a dialogue box to help you create a custom canvas. It also has the image size information of the canvas you opened it from.
In the image below, you can see that the size of the chili image is 77 x 285px (pixels or picture elements).
5. Do the same with canvas 2 and note the image size. It is 368 x 224 px. So, to work comfortably, the third canvas should be 368 x 285 px. Let's round it up to 800 x 300. I have doubled the width. You'll understand why when you start working on a similar project. Enter 800 against width and 300 against height as shown below and click ok. You now have a new drawing board that's just the right size for combining the images.
Here's how you can combine them.
Preparing the Canvas
1. Open GIMP.
2. From the File Menu choose Open to open the two image files. You'll find that they open on two different canvases.

3. You'll need a third canvas to work on; customized to accommodate both images. You can open a new one from any of the already open canvases. But how do you determine the size of your new canvas?
4. To do this, click new from the file menu of the chili canvas. It opens a dialogue box to help you create a custom canvas. It also has the image size information of the canvas you opened it from.
In the image below, you can see that the size of the chili image is 77 x 285px (pixels or picture elements).
5. Do the same with canvas 2 and note the image size. It is 368 x 224 px. So, to work comfortably, the third canvas should be 368 x 285 px. Let's round it up to 800 x 300. I have doubled the width. You'll understand why when you start working on a similar project. Enter 800 against width and 300 against height as shown below and click ok. You now have a new drawing board that's just the right size for combining the images.
Combining the Images
6. Right click on the image in the first drawing board to copy and paste it to the new board. Don't cut it. In case something goes wrong, you'll need the original to start over. You may get a drop down list from the one shown below. In that case select - Edit - copy; or if you can use the short cut keys for copy/paste.
7. Do the same with the second image. When both are pasted on the fresh canvas, your screen should look like the screen shot below. One image overlaps the other.
8. Select the move tool from the tool box and use it to move the picture on top.
9. Okay, done. But the images overlap. What do you do now?
10. Menu Bar - Layer - Transparency - Color to Alpha...
11. You can see the result of these actions in the preview area of the drop down box, screen shot below.
The portion of the image that has no colour on it is now transparent and that's what we want. Click on ok. You now have a precisely combined new image.
12. Now that you have the basic combined image, you can start playing around with it. But first crop it to your specifications in Paint or MS picture editor. You can't open a file saved in GIMP from another application. So, copy the image and manually paste it in Paint. The screen shot below will show you how.
13. Paste the image in Paint, crop it and save it. Here's what mine looks like after the cropping. But can't you do this in GIMP itself? You can. But I did not get the result I want. There are 3 crop options in the Image tab of the GIMP menu bar. Try each of these and see what happens.
14. To get the effect in the image below, go to GIMP Menu bar- Filters - Artistic - Apply canvas.
I have deliberately refrained from using layers in this tutorial.
If you have any doubts or questions regarding the methods explained in this post, leave a comment and I will do my best to clear your doubts.


No comments:
Post a Comment